https://minikube.sigs.k8s.io/


Kubernetes를 공부할 때 실습 환경으로 종종 minikube가 언급되지만

개인적으로 Kubernetes 공부 용도로는 minikube를 절대 추천하지 않는다.


사실 여러 부분에서 K8s를 제대로 구성한 것과의 차이가 꽤 크기 때문이다.


그리고 제대로 K8s 공부하기 위해서는 3대 이상의 머신 구성이 필요하지만

minikube로는 그런 상황에 대해서 실습을 할 수 없다.


그리고, 결정적으로 실제 업무 용도로 minikube를 사용하지 않기에

굳이 minikube에 시간 투자할 필요가 없다고 생각했었다.


하지만, 세상 모든 것은 나름의 쓸모가 있다!


그렇다. minikube가 필요해서 설치 과정을 정리해보고자 한다 ^^


0. What you’ll need

- 2 CPUs or more

- 2GB of free memory

- 20GB of free disk space

- Internet connection

- Container or virtual machine manager

  . such as: Docker, QEMU, Hyperkit, Hyper-V, KVM, Parallels, Podman, VirtualBox, or VMware Fusion/Workstation


1. 실습 환경

나는 VirtualBox를 이용하기로 했다.

VirtualBox


- 2 CPUs or more

- 4GB of free memory

- 50GB of free disk space

- Internet connection


VBox


- OS: Ubuntu 20.04 LTS

- Container or virtual machine manager : Docker

  . Docker 설치 방법: https://www.whatwant.com/entry/docker-buildx

docker


2. minikube 설치

- 공식 홈페이지에서는 각 환경 別 설치 방법을 상당히 편리한 UX로 제공해주고 있다.

  . https://minikube.sigs.k8s.io/docs/start/


https://minikube.sigs.k8s.io/docs/start/


> curl -LO https://storage.googleapis.com/minikube/releases/latest/minikube-linux-amd64

> sudo install minikube-linux-amd64 /usr/local/bin/minikube


그대로 실행하면 끝이다.

minikube install


3. minikube start

minikube를 구동시키면 귀여운 이모지들과 함께 다운로드 및 설치 등이 진행된다.

minikube start


4. kubectl 설치

Kubernetes(minikube)에 명령어를 전달하기 위해서는 'kubectl'가 필요하다.

  . https://kubernetes.io/docs/tasks/tools/install-kubectl-linux/

https://kubernetes.io/docs/tasks/tools/install-kubectl-linux/


가이드 문서에 있는 내용을 참조해서 설치 진행하면 된다.

kubectl install


❯ curl -LO "https://dl.k8s.io/release/$(curl -L -s https://dl.k8s.io/release/stable.txt)/bin/linux/amd64/kubectl"

❯ sudo install -o root -g root -m 0755 kubectl /usr/local/bin/kubectl

❯ kubectl version --client


잘 동작하는지 살펴보자.

kubectl


5. Dashboard

대시보드도 손쉽게 볼 수 있다.

dashboard


❯ minikube addons enable metrics-server

❯ minikube dashboard 


간단하게 Kubernetes를 맛보기 하는 용도로 정말 간단하게 설치할 수 있는 좋은 도구이다!!!


반응형

Kubernetes 설치를 저와 같이 했다면, addon으로 Dashboard도 설치가 되었을 것이다.

https://www.whatwant.com/entry/Kubernetes-Install-1


그런데, 정말 설치가 잘 되었을까?

K8s master 서버에 접속 후 한 번 살펴보자.


(master)$ kubectl get deployments --namespace kube-system

NAME                         READY   UP-TO-DATE   AVAILABLE   AGE
calico-kube-controllers      1/1     1            1           3d19h
coredns                      2/2     2            2           3d19h
dns-autoscaler               1/1     1            1           3d19h
kubernetes-dashboard         1/1     1            1           3d19h
kubernetes-metrics-scraper   1/1     1            1           3d19h
metrics-server               1/1     1            1           3d19h


오옷! 뭔가 보인다.

"kubernetes-dashboard"라는 항목이 보인다.


어떻게 접근해야할지 확인하기 위해 service 항목들을 살펴보자.


(master)$ kubectl get services --namespace kube-system

NAME                        TYPE        CLUSTER-IP      EXTERNAL-IP   PORT(S)                  AGE
coredns                     ClusterIP   10.233.0.3      <none>        53/UDP,53/TCP,9153/TCP   3d19h
dashboard-metrics-scraper   ClusterIP   10.233.43.183   <none>        8000/TCP                 3d19h
kubernetes-dashboard        ClusterIP   10.233.51.126   <none>        443/TCP                  3d19h
metrics-server              ClusterIP   10.233.30.232   <none>        443/TCP                  3d19h


아직 ClusterIP로만 연결되었기 때문에 K8s 밖에서 연결해볼 수 없는 상태다.

밖에서 접근할 수 있는 경로를 만들어보자.


dashboard의 service 항목을 수정해보자.


(master)$ kubectl edit service --namespace kube-system kubernetes-dashboard


ClusterIP 부분을 "NodePort"로 변경하면 된다.


...
  selector:
    k8s-app: kubernetes-dashboard
  sessionAffinity: None
  type: ClusterIP
status:
  loadBalancer: {}


다시 확인해보자.


(master)$ kubectl get services --namespace kube-system

NAME                        TYPE        CLUSTER-IP      EXTERNAL-IP   PORT(S)                  AGE
coredns                     ClusterIP   10.233.0.3      <none>        53/UDP,53/TCP,9153/TCP   3d21h
dashboard-metrics-scraper   ClusterIP   10.233.43.183   <none>        8000/TCP                 3d21h
kubernetes-dashboard        NodePort    10.233.51.126   <none>        443:31934/TCP            3d21h
metrics-server              ClusterIP   10.233.30.232   <none>        443/TCP                  3d21h


NodePort로 잘 변경되었으며 "31934"포트로 연결할 수 있음을 알려주고 있다.

바로 웹브라우져로 열어보자.


kubernetes-dashboard는 기본적으로 443포트, https 방식으로 제공되고 있다.

하지만, 당연하게도 인증서가 공인 인증서가 아니기에 ...


그러나, 고급 버튼을 누르면 길이 보인다.


안전하지 않다고 하지만, 전부 내거인데 뭐~ 그냥 이동하자 ^^


어!? 인증이 필요하단다.

이런...


그래... 권한이 필요하겠지...


dashboard를 위한 Service Account를 하나 생성하자.


(master)$ nano dashboard-serviceaccount.yaml

apiVersion: v1
kind: ServiceAccount
metadata:
   name: k8s-dashboard
   namespace: kube-system


ClusterRole Admin 권한을 부여하자.


(master)$ nano dashboard-clusterrolebinding.yaml

apiVersion: rbac.authorization.k8s.io/v1
kind: ClusterRoleBinding
metadata:
  name: k8s-dashboard
roleRef:
  apiGroup: rbac.authorization.k8s.io
  kind: ClusterRole
  name: cluster-admin
subjects:
- kind: ServiceAccount
  name: k8s-dashboard
  namespace: kube-system


전부 create 해주면 된다.


(master)$  kubectl create -f dashboard-serviceaccount.yaml

(master)$  kubectl create -f dashboard-clusterrolebinding.yaml


만들어진 Service Account 정보를 살펴보자.


(master)$ kubectl describe serviceaccounts --namespace kube-system k8s-dashboard

Name:                k8s-dashboard
Namespace:           kube-system
Labels:              <none>
Annotations:         <none>
Image pull secrets:  <none>
Mountable secrets:   <none>
Tokens:              <none>
Events:              <none>


어?! Tokens 부분에 아무런 정보가 없다! 이게 뭐지!?

https://kubernetes.io/docs/concepts/configuration/secret/#service-account-token-secrets


Kubernetes 1.22 이후 버전부터는 token이 자동 생성되지 않는단다! 이런!


(master)$ kubectl get nodes

NAME       STATUS   ROLES           AGE     VERSION
master     Ready    control-plane   3d20h   v1.25.6
worker01   Ready    <none>          3d20h   v1.25.6
worker02   Ready    <none>          3d20h   v1.25.6


나는 지금 v1.25.6 버전이구나.

그럼 직접 token을 생성하는 수밖에 ...


(master)$ nano dashboard-token.yaml

apiVersion: v1
kind: Secret
metadata:
  name: k8s-dashboard-secret
  annotations:
    kubernetes.io/service-account.name: "k8s-dashboard"
type: kubernetes.io/service-account-token


Service Account가 있는 kube-system namespace에다가 만들어주면 된다.


(master)$ kubectl create -f dashboard-token.yaml --namespace kube-system


만들어진 secret 정보를 살펴보면 token 정보도 보일 것이다.


(master)$ kubectl describe secrets --namespace kube-system k8s-dashboard-secret

Name:         k8s-dashboard-secret
Namespace:    kube-system
Labels:       <none>
Annotations:  kubernetes.io/service-account.name: k8s-dashboard
              kubernetes.io/service-account.uid: 037ee808-781e-424b-a17a-215113708a3b

Type:  kubernetes.io/service-account-token

Data
====
ca.crt:     1099 bytes
namespace:  11 bytes
token:      eyJhbGciOiJSUzI1NiIsImtpZCI6IkdBa0Mtc29XS1NGYl9pb1VuZzhpOHhQWlZaZEVOVTBIMWFQTHlVY21VNVUifQ.eyJpc3MiOiJrdWJlcm5ldGVzL3NlcnZpY2VhY2NvdW50Iiwia3ViZXJuZXRlcy5pby9zZXJ2aWNlYWNjb3VudC9uYW1lc3BhY2UiOiJrdWJlLXN5c3RlbSIsImt1YmVybmV0ZXMuaW8vc2VydmljZWFjY291bnQvc2VjcmV0Lm5hbWUiOiJrOHMtZGFzaGJvYX...


그러면, Service Account 정보를 다시 살펴보자.


(master)$ kubectl describe serviceaccounts --namespace kube-system k8s-dashboard

Name:                k8s-dashboard
Namespace:           kube-system
Labels:              <none>
Annotations:         <none>
Image pull secrets:  <none>
Mountable secrets:   <none>
Tokens:              k8s-dashboard-secret
Events:              <none>


token 정보가 연결되었음을 볼 수 있다.


이제, 앞에서 확인한 token 정보를 복사한 뒤에 dashboard에 입력해보자.


음?! 표시할 데이터가 없단다.

얼마나 힘들게 여기까지 들어왔는데!!!!


검색창 옆에 namespace 부분을 "kube-system"으로 변경해보자.


뭔가 많이 보인다~~~!!!


눈에 뭔가 보이니까 좋다! ^^

반응형

간만에 Kubernetes 실습 환경 구축할 일이 생겨서

새로운 마음으로 진행하면서 기록으로 남겨 보고자 한다.


1. Server

  - master 1대 + worker 2대 = 총 3대의 Server를 준비하자.

  - 실습 환경은 VirtualBox로 하겠지만, 물리적인 Server로 이하 과정을 진행해도 무방하다.


VirtualBox


① CPU / Memory

  - Kubernetes 설치를 위해서는 다음과 같은 최소 사양이 필요하다

    . master: 2core, 2048MB

    . worker: 1core, 1280MB

  - 하지만, 원활한 동작을 위해서는 모두 2core, 2GB Spec으로 구성하자


CPU


Memory


② Network

  - VirtualBox의 경우 사실 NAT 방식으로도 Kubernetes 설치가 가능하긴 하다.

  - 하지만, 실제 서버 구성과 같은 환경으로 실습을 진행해보기 위해서는 브리지 방식으로 구성해보자.


네트워크


  - 보통 집에서 인터넷을 쓰는 방식이라고 하면 아래 그림과 같은 구성이 될 것이다.


③ Hostname, IP

  - 각 서버의 hostname 및 IP를 확인해 놓자.


hostname, IP


  - worker01 / worker02 서버들의 정보도 추가 확인하자.


2. Server Configure

  - Kubernetes 설치를 위해 서버 환경 셋팅을 좀 해줘야 한다.

  - 아래 과정은 서버 3대 모두 똑같이 진행해줘야 한다.


① swap off

  - K8s에서는 swap 기능이 켜져 있으면 문제가 발생할 수 있으므로 꺼줘야 한다.


(master/worker)$ sudo swapoff -a

(master/worker)$ sudo nano /etc/fstab


  - 재부팅되더라도 유지될 수 있도록 아래와 같이 swap 부분을 주석 처리해준다.


# /swap.img   none    swap    sw  0   0


② ip_forward

  - 가상화 머신끼리 패킷을 주고받을 수 있도록 ip_forward 기능을 켜줘야 한다.


(master/worker)$ sudo sh -c 'echo 1 > /proc/sys/net/ipv4/ip_forward'


③ hosts

  - 서버끼리 서로 알 수 있도록 hosts 정보도 등록해주자.


(master/worker)$ sudo nano /etc/hosts


  - 정보는 각자 상황에 맞춰서...


192.168.100.150 master
192.168.100.151 worker01
192.168.100.152 worker02


  - 혹시 상단에 아래와 같은 부분이 있으면 삭제하자


127.0.0.1 master


여기까지 진행했으면 깔끔한 진행을 위해 재부팅을 한 번 해주자.

VirtualBox의 장점을 살리기 위해서는 안전한 진행을 위해 snapshot 한 번 찍어주는 것도 좋다.


3. Kubernetes 설치

  - Kubespray를 이용해서 Kubernetes 설치를 진행하도록 하겠다.


① Python3 설치

  - 일단 기본 패키지로 설치하자


(master)$ sudo apt install -y python3 python3-pip


② ssh-key 생성

  - 서버間 연결을 위해 ssh-key 생성 및 등록 과정이 필요하다.

  - 이와 관련해 가장 깔끔한 가이드 문서는 아래와 같다. 참고하면 좋다.

    . https://cloud.google.com/compute/docs/connect/create-ssh-keys?hl=ko 


  - 여기에서는 가장 간단하게 그냥 무조건 기본값으로 그냥 막 엔터만 쳐서 생성하도록 하자.


(master)$ ssh-keygen

Generating public/private rsa key pair.
Enter file in which to save the key (/home/whatwant/.ssh/id_rsa):
Enter passphrase (empty for no passphrase):
Enter same passphrase again:
Your identification has been saved in /home/whatwant/.ssh/id_rsa
Your public key has been saved in /home/whatwant/.ssh/id_rsa.pub
The key fingerprint is:
SHA256:MtIQVARuKNcksL0D3beQ2aMMbMYfcdybNFVZVRGgDnQ whatwant@master
The key's randomart image is:
+---[RSA 3072]----+
|....*=+. o.E.+o+*|
| * B B. = . o    |
|+ @ @ +. = .     |
| * * B oo o      |
|  o = = S  .     |
|   . . o         |
|                 |
|                 |
|                 |
+----[SHA256]-----+


③ copy key

  - ssh-key 인증을 통해 master에서 worker로 접속할 수 있도록 하기 위한 과정이다

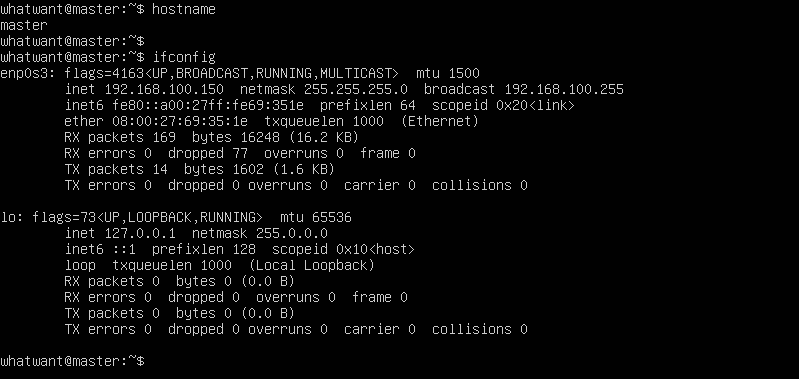
  - 명령어에 있는 IP는 worker들의 IP이다. 각자 상황에 맞춰 사용하면 된다.

  - 자기 자신(master)에도 등록을 하자.


(master)$ ssh-copy-id 192.168.100.151

/usr/bin/ssh-copy-id: INFO: Source of key(s) to be installed: "/home/whatwant/.ssh/id_rsa.pub"
The authenticity of host '192.168.100.151 (192.168.100.151)' can't be established.
ED25519 key fingerprint is SHA256:Nu127IO/HdpFbO3HvWB8J61ZdhGjXpYDBSb3qg3rSY8.
This key is not known by any other names
Are you sure you want to continue connecting (yes/no/[fingerprint])? yes
/usr/bin/ssh-copy-id: INFO: attempting to log in with the new key(s), to filter out any that are already installed
/usr/bin/ssh-copy-id: INFO: 1 key(s) remain to be installed -- if you are prompted now it is to install the new keys
whatwant@192.168.100.151's password:

Number of key(s) added: 1

Now try logging into the machine, with:   "ssh '192.168.100.151'"
and check to make sure that only the key(s) you wanted were added.

(master)$ ssh-copy-id 192.168.100.152

(master)$ ssh-copy-id 192.168.100.150


④ Kubespray 내려받기

  - git clone 방식으로 내려 받고, 최신 버전으로 switch 하자.


(master)$ git clone https://github.com/kubernetes-sigs/kubespray.git

(master)$ cd kubespray

(master)$ git switch release-2.21


⑤ 의존성 패키지 설치

  - Kubespray에서 필요로 하는 의존성 패키지들을 설치해주자


(master)$ sudo pip3 install -r requirements.txt


⑥ 인벤토리 생성

  - sample을 기반으로 나만의 설정을 업데이트해주면 된다.

  - 당연히 아래 IP 정보는 각자 상황에 맞춰서...


(master)$ cp -rfp inventory/sample inventory/mycluster


(master)$ declare -a IPS=(192.168.100.150 192.168.100.151 192.168.100.152)
(master)$ CONFIG_FILE=inventory/mycluster/hosts.yaml python3 contrib/inventory_builder/inventory.py ${IPS[@]}


  - 이렇게 생성된 hosts.yaml 파일을 확인 및 수정하자.


(master)$ nano ./inventory/mycluster/hosts.yaml


  - 아래 수정 내역은 공부를 위한 설정이다. 실제 운영 환경이라면 기본 설정대로 하는 것이 낫다.


all:
  hosts:
    master:
      ansible_host: 192.168.100.150
      ip: 192.168.100.150
      access_ip: 192.168.100.150
    worker01:
      ansible_host: 192.168.100.151
      ip: 192.168.100.151
      access_ip: 192.168.100.151
    worker02:
      ansible_host: 192.168.100.152
      ip: 192.168.100.152
      access_ip: 192.168.100.152
  children:
    kube_control_plane:
      hosts:
        master:
    kube_node:
      hosts:
        worker01:
        worker02:
    etcd:
      hosts:
        master:
    k8s_cluster:
      children:
        kube_control_plane:
        kube_node:
    calico_rr:
      hosts: {}


  - addon은 다음 3가지 정도만 설정해보자.


(master)$ nano ./inventory/mycluster/group_vars/k8s_cluster/addons.yml
dashboard_enabled: true
helm_enabled: true
metrics_server_enabled: true


  - proxy mode도 iptables로 설정하자.


(master)$ nano ./inventory/mycluster/group_vars/k8s_cluster/k8s-cluster.yml
# Kube-proxy proxyMode configuration.
# Can be ipvs, iptables
kube_proxy_mode: iptables


⑦ install

  - 이제 설치를 진행하자 !


(master)$ ansible-playbook -i inventory/mycluster/hosts.yaml --become --become-user=root cluster.yml


  - 혹시라도 에러가 발생하면 윗 단계들을 다시 한 번 꼼꼼하게 살펴보기 바란다.

  - 지금 직접 해보면서 포스팅하는 것이기에, 분명히 된다 !!! ^^


4. kubectl

  - master 서버에서 root 아닌 계정도 kubectl 명령을 사용할 수 있도록 하자


① 인증 정보 복사

  - root 계정에 등록된 인증 정보를 복사해오면 된다.


(master)$ mkdir -p ~/.kube

(master)$ sudo cp -i /etc/kubernetes/admin.conf ~/.kube/config

(master)$ sudo chown $(id -u):$(id -g) ~/.kube/config


② 자동완성

  - bash 쉘 환경에서 자동완성 기능을 추가하려면 다음과 같이 하면 된다.


(master)$ echo 'source <(kubectl completion bash)' >>~/.bashrc

(master)$ source ~/.bashrc


③ check

  - 잘 동작하는지 해보자.


(master)$ kubectl cluster-info

Kubernetes control plane is running at https://127.0.0.1:6443

To further debug and diagnose cluster problems, use 'kubectl cluster-info dump'.


(master)$ kubectl get nodes

NAME       STATUS   ROLES           AGE   VERSION
master     Ready    control-plane   21m   v1.25.6
worker01   Ready    <none>          20m   v1.25.6
worker02   Ready    <none>          20m   v1.25.6


잘 된다!!!!!


반응형


GCP, AWS와 같은 Cloud 업체에서 제공해주는 Managed K8s 환경을 사용하는 것이 아니라,

Local 환경에서 직접 K8s를 설치하는 경우

Ingress를 이용하기 위해서는 추가적인 설치를 해야 한다.


다른 네트워크 관련된 것들과 마찬가지로

Ingress도 여러가지 중에 선택적으로 설치해서 사용해야 한다.


직접 설치해서 사용하는 경우 일반적으로 Nginx 기반의 Ingress를 선택한다.

그런데, 이 부분에서 고생을 했던 이유가 Nginx 기반 Ingress 자체도 종류가 여러가지라는 것이다.


그 중에서 대표적인 Nginx Ingress Controller는 다음의 2가지 이다.

  - kubernetes/ingress-nginx

  - nginxinc/kubernetes-ingress


첫번째 것은 Kubernetes 진영에서 배포하고 있는 ingress-nginx 이고,

두번째 것은 Nginx 진영에서 배포하고 있는 nginx-ingress 이다.


두 배포판의 차이점을 정리한 내용은 다음 링크에서 확인해보면 된다.

  - https://docs.nginx.com/nginx-ingress-controller/intro/nginx-ingress-controllers


기능적으로 Nginx에서 배포하는 것이 좀 더 다양한 것 같기는 한데,

아무래도 Kubernetes 문서에서 보이는 Ingress 내용들의 기준이 되는 것은

`kubernetes/ingress-nginx`일 것이다.


그런데, 문제는 Kubespray로 Kubernetes를 설치할 때

addon으로 ingress를 선택하게 되면

이 때 설치되는 것이 'kubernetes/ingress-nginx'가 아니다.

(잘못알고 있을 수도 있으니, 정확히 알고 계신 분들 계시면 제보 바랍니다)


그래서,

Kubespray를 이용해서 Kubernetes를 설치할 때

addon 설정할 때 ingress를 선택하지 말고

나중에 직접 Ingress를 설치하는 방법으로 하고자 한다.


Kubernetes는 설치를 마친 상태에서

Ingress 설치를 하는 과정으로 진행해보자.


Reference

  - https://github.com/kubernetes/ingress-nginx/

  - https://kubernetes.github.io/ingress-nginx/deploy/


다양한 환경에서의 설치 방법이 각각 있지만,

우리가 여기에서 살펴볼 것은 Bare-Metal 환경을 기준으로 하겠다.

  - https://kubernetes.github.io/ingress-nginx/deploy/#bare-metal


그리고, 이 방법은 `Nodeport` 방식으로 설정된다.

(LoadBalancer가 있으면 그것을 이용하겠지만, 개인적으로 구축한 K8s 환경에서는...)


사실, 설치 방법은 너무나 쉽다.

단 1줄 !!!


$ kubectl apply -f https://raw.githubusercontent.com/kubernetes/ingress-nginx/controller-v1.0.0/deploy/static/provider/baremetal/deploy.yaml


정말 중요한 것은

잘 동작하는지 검증을 해보는 것일 것이다.


Namespace로 작업 공간 확보한 다음

Deployment 만들고 Service 만들어서

Ingress로 접근하도록 해보자.


① 따로 방을 잡아놓기 위해 Namespace 만들고,

$ nano 01.Namespace.yaml
apiVersion: v1
kind: Namespace
metadata:
  name: test-ingress


② Deployment를 이용해 Pod를 만들어 놓자

$ nano 02.Deployment.yaml
apiVersion: apps/v1
kind: Deployment
metadata:
  name: web-deploy

spec:
  replicas: 3

  selector:
    matchLabels:
      app: web

  template:
    metadata:
      name: web-pod
      labels:
        app: web

    spec:
      containers:
      - image: whatwant/node-web:1.0
        name: web
        ports:
        - containerPort: 8080
          protocol: TCP


③ Pod들을 연결할 Service를 만들자

$ nano 03.Service.yaml
apiVersion: v1
kind: Service
metadata:
  name: web-svc

spec:
  ports:
  - port: 80
    targetPort: 8080

  selector:
    app: web


지금까지 만들어 놓은 YAML을 실행하자

$ kubectl create -f ./01.Namespace.yaml

$ kubectl create --namespace=test-ingress -f ./02.Deployment.yaml

$ kubectl create --namespace=test-ingress -f ./03.Service.yaml


이제, 본론이다!

Ingress를 만들어서 Service를 외부로 오픈해보자.

$ nano ./04.Ingress.yaml
apiVersion: networking.k8s.io/v1
kind: Ingress
metadata:
  name: web-ingress
  annotations:
    nginx.ingress.kubernetes.io/rewrite-target: /

spec:
  rules:
  - http:
      paths:
      - path: /test
        pathType: Prefix
        backend:
          service:
            name: web-svc
            port:
              number: 80


만들어 놓은 YAML을 실행하자

$ kubectl create --namespace=test-ingress -f ./04.Ingress.yaml


이제 Web-Browser로 확인을 하면 되는데,

ingress-nginx가 지금 어떤 IP의 어떤 Port로 서비스 되고 있는 것일까?

$ kubectl get services --namespace=ingress-nginx

NAME                                       TYPE           CLUSTER-IP     EXTERNAL-IP   PORT(S)                               AGE
ingress-nginx-controller                 NodePort    10.233.29.64    <none>          80:32035/TCP,443:32407/TCP   11h
ingress-nginx-controller-admission   ClusterIP     10.233.38.85    <none>          443/TCP                              11h


`ingress-nginx`는 지금 `NodePort` 방식으로 서비스 되고 있으므로 IP는 node들의 IP 아무것이나 ...

Port는 http는 32035, https는 32407을 사용하고 있음을 확인할 수 있다.

(당연히 각자의 환경에서 Port는 다를 수 있다)


그러면, 이제 웹브라우저로 확인해보자.


어?! 왜 안되지 ?!

멍청하면 손발이 고생한다고... 이 문제를 해결하려고 3일 넘게 잠도 잘 못자고 정말 고생했다 ㅠㅠ


엄청난 구글링 시도를 했지만 속시원한 해결책을 찾지 못하다가... 결국은 방법을 찾았다.


일단, ingress-nginx의 로그를 확인해야 했었다.

$ kubectl logs --namespace=ingress-nginx ingress-nginx-controller-57ffff5864-p52bb -f
-------------------------------------------------------------------------------
NGINX Ingress controller
  Release:       v1.0.0
  Build:         041eb167c7bfccb1d1653f194924b0c5fd885e10
  Repository:    https://github.com/kubernetes/ingress-nginx
  nginx version: nginx/1.20.1

-------------------------------------------------------------------------------

W0918 04:05:51.466315       6 client_config.go:615] Neither --kubeconfig nor --master was specified.  Using the inClusterConfig.  This might not work.
I0918 04:05:51.466488       6 main.go:221] "Creating API client" host="https://10.233.0.1:443"
I0918 04:05:51.476011       6 main.go:265] "Running in Kubernetes cluster" major="1" minor="20" git="v1.20.7" state="clean" commit="132a687512d7fb058d0f5890f07d4121b3f0a2e2" platform="linux/amd64"
I0918 04:05:51.723687       6 main.go:104] "SSL fake certificate created" file="/etc/ingress-controller/ssl/default-fake-certificate.pem"
I0918 04:05:51.740515       6 ssl.go:531] "loading tls certificate" path="/usr/local/certificates/cert" key="/usr/local/certificates/key"
I0918 04:05:51.769911       6 nginx.go:253] "Starting NGINX Ingress controller"
I0918 04:05:51.783535       6 event.go:282] Event(v1.ObjectReference{Kind:"ConfigMap", Namespace:"ingress-nginx", Name:"ingress-nginx-controller", UID:"9e277dae-b490-471f-806f-c88f9554da0f", APIVersion:"v1", ResourceVersion:"32531", FieldPath:""}): type: 'Normal' reason: 'CREATE' ConfigMap ingress-nginx/ingress-nginx-controller
I0918 04:05:52.972526       6 nginx.go:295] "Starting NGINX process"
I0918 04:05:52.972784       6 nginx.go:315] "Starting validation webhook" address=":8443" certPath="/usr/local/certificates/cert" keyPath="/usr/local/certificates/key"
I0918 04:05:52.972852       6 leaderelection.go:243] attempting to acquire leader lease ingress-nginx/ingress-controller-leader...
I0918 04:05:52.973417       6 controller.go:150] "Configuration changes detected, backend reload required"
I0918 04:05:52.985822       6 leaderelection.go:253] successfully acquired lease ingress-nginx/ingress-controller-leader
I0918 04:05:52.992811       6 status.go:84] "New leader elected" identity="ingress-nginx-controller-57ffff5864-p52bb"
I0918 04:05:53.007665       6 status.go:204] "POD is not ready" pod="ingress-nginx/ingress-nginx-controller-57ffff5864-p52bb" node="worker2"
I0918 04:05:53.043798       6 controller.go:167] "Backend successfully reloaded"
I0918 04:05:53.043952       6 controller.go:178] "Initial sync, sleeping for 1 second"
I0918 04:05:53.044349       6 event.go:282] Event(v1.ObjectReference{Kind:"Pod", Namespace:"ingress-nginx", Name:"ingress-nginx-controller-57ffff5864-p52bb", UID:"6b9e8d63-801f-4ac2-8533-8a0164e792bf", APIVersion:"v1", ResourceVersion:"32685", FieldPath:""}): type: 'Normal' reason: 'RELOAD' NGINX reload triggered due to a change in configuration
I0918 05:25:59.272392       6 main.go:101] "successfully validated configuration, accepting" ingress="web-ingress/test-ingress"
I0918 05:25:59.278726       6 store.go:361] "Ignoring ingress because of error while validating ingress class" ingress="test-ingress/web-ingress" error="ingress does not contain a valid IngressClass"
I0918 05:38:54.461751       6 store.go:336] "Ignoring ingress because of error while validating ingress class" ingress="test-ingress/web-ingress" error="ingress does not contain a valid IngressClass"
I0918 05:39:44.049518       6 main.go:101] "successfully validated configuration, accepting" ingress="web-ingress/test-ingress"
I0918 05:39:44.053660       6 store.go:361] "Ignoring ingress because of error while validating ingress class" ingress="test-ingress/web-ingress" error="ingress does not contain a valid IngressClass"


그렇다. 원인은 로그에 다 있었다 ㅠㅠ


`IngressClass`가 문제란다.

이걸 해결하면 되는데...

$ nano ./04.Ingress.yaml
apiVersion: networking.k8s.io/v1
kind: Ingress
metadata:
  name: web-ingress
  annotations:
    nginx.ingress.kubernetes.io/rewrite-target: /
    ingressclass.kubernetes.io/is-default-class: true

spec:
  rules:
  - http:
      paths:
      - path: /test
        pathType: Prefix
        backend:
          service:
            name: web-svc
            port:
              number: 80


annotation 한 줄 추가해주면 된다.


모든 Ingress에 저렇게 입력하기 싫다면,

기본 IngressClass nginx를 수정하면 된다.


`ingress-nginx` namespace에 있는 ingressclass를 살펴보면 `nginx` 이름으로 존재하고 있다.

$ kubectl get ingressclasses --namespace=ingress-nginx 

NAME    CONTROLLER             PARAMETERS   AGE
nginx     k8s.io/ingress-nginx     <none>          12h


edit 하면 되는데,

막간을 이용해서 tip 하나 추가하자면,

기본적으로 `kubectl edit`를 하게되면 기본 에디터로 `vi`가 실행된다.


vi를 싫어하는 나같은 사람들을 위해 에디터 변경을 하는 방법이 있다.

$ export KUBE_EDITOR=nano


그리고, 이제 edit를 해보자.

$ kubectl edit ingressclasses nginx --namespace=ingress-nginx
apiVersion: networking.k8s.io/v1
kind: IngressClass
metadata:
  annotations:
    ingressclass.kubernetes.io/is-default-class: "true"
    kubectl.kubernetes.io/last-applied-configuration: |
      {"apiVersion":"networking.k8s.io/v1","kind":"IngressClass","metadata":{"annotations":{},"labels":{"app.kubernetes.io/component":"controller","app.kubernetes.io/instance":"ingress-nginx","app.kubernetes.io/managed-by":"Helm","app.kubernetes.io/name":"ingress-nginx","app.kubernetes.io/version":"1.0.0","helm.sh/chart":"ingress-nginx-4.0.1"},"name":"nginx"},"spec":{"controller":"k8s.io/ingress-nginx"}}
  creationTimestamp: "2021-09-18T04:05:10Z"
  generation: 1
  labels:
    app.kubernetes.io/component: controller
    app.kubernetes.io/instance: ingress-nginx
    app.kubernetes.io/managed-by: Helm
    app.kubernetes.io/name: ingress-nginx
    app.kubernetes.io/version: 1.0.0
    helm.sh/chart: ingress-nginx-4.0.1
  name: nginx
  resourceVersion: "102271"
  uid: 13fa4354-bb3d-4dee-ae56-5d14600354cb
spec:
  controller: k8s.io/ingress-nginx


나머지는 모르겠고 ... 위에 색으로 칠한 부분만 추가되어 있으면 된다.


문제 해결을 위해 열심히 구글링 하면서 알게된 지식 추가 공유 !


- Ingress 생성할 때, 연결하고자 하는 Service가 있는 namespace에 같이 존재해야 한다

  . Ingress Controller는 전체 namespace를 바라보고 있기에 가능하다.


- Ingress와 연결되는 Service는 Cluster IP와 매핑이 된다.

  . 그래서 Service는 Nodeport 타입이어도 되고, 아니어도 된다.


이번에는 여기까지~

반응형


오늘 포스팅을 위해

그동안 많은 과정을 거쳐왔나보다 ^^


- 오래된 노트북 - 우분투 서버로 만들기 (Ubuntu 20.04 Server)

- Ubuntu 18.04 에서 Python3 편하게 사용하기
- Kubernetes Install (Ubuntu 20.04)
- Kubespray 이용하여 Kubernetes 설치하기
- Vagrant 이미지 업로드 (VirtualBox)
- Vagrant 사용하기 - 기본

- Vagrant 여러 개의 VM 생성하기


포스팅으로만 하면 위의 내용 정도뿐이지만,

그 뒤에서 공부하고 시행착오를 겪은 것을 합치면.... 에휴...

멍청하면 손발 뿐만 아니라 온몸이 고생한다더니...


로컬 환경에서 VM을 이용한 Kubernetes 실습 환경을 갖추는 것이 목표이다.


VM 생성도 Vagrant를 이용해서 기본적인 사항은 편하게 할 수 있도록 했고,

Kubernetes 설치 과정은 공부를 위해 직접 수행하는 방식으로 구성했다.


즉, Ubuntu 꾸미기(?) 등과 같은 과정은 Skip 하고

공부가 필요한 Kubernetes 설치 과정은 가급적 직접 수행해보자.


(물론 Kubespray를 사용하지 않고 정말 쌩으로 해보면 좋겠지만... 어느 정도는 ^^)


0. Host Environment

  - 다음 Spec이 최소사양이라는 말은 아니고, 참고하시라고...

    . CPU: AMD Ryzen 5 3600X

    . RAM: 32GB

    . VGA: Nvidia GeForce RTX 2060

    . OS: Windows 10 Pro


1. Vagrant 설치

  - https://www.vagrantup.com/


2. VirtualBox 설치

  - https://www.virtualbox.org/


3. Vagrant Up

  - 다음 내용의 Vagrantfile을 이용해서 VM을 생성하자

    (개인적인 취향으로 Host의 git-bash 환경에서 작업하는 것을 좋아하기에

     아래 sh 명령어들이 linux 스타일로 되어있다)


host$ mkdir k8s-vm
host$ cd k8s-vm
host$ nano Vagrantfile
host$ vagrant up


# -*- mode: ruby -*-
# vi: set ft=ruby :

N = 2


Vagrant.configure("2") do |config|


  config.vm.define "w-k8s-master" do |cfg|

    cfg.vm.box = "whatwant/Ubuntu-20.04-Server"
    cfg.vm.box_version = "0.2.0"

    cfg.vm.hostname = "master"
    cfg.vm.network "public_network", ip: "192.168.100.200"

    cfg.vm.provider "virtualbox" do |vb|
      vb.gui = false
      vb.cpus = "2"
      vb.memory = "2048"
    end

    cfg.vm.provision "shell", inline: <<-SHELL
      apt-get update
      apt-get upgrade -y
    SHELL

  end


  (1..N).each do |i|
    config.vm.define "w-k8s-worker#{i}" do |cfg|

      cfg.vm.box = "whatwant/Ubuntu-20.04-Server"
      cfg.vm.box_version = "0.2.0"

      cfg.vm.hostname = "worker#{i}"
      cfg.vm.network "public_network", ip: "192.168.100.20#{i}"

      cfg.vm.provider "virtualbox" do |vb|
        vb.gui = false
        vb.cpus = "1"
        vb.memory = "1280"
      end

      cfg.vm.provision "shell", inline: <<-SHELL
        apt-get update
        apt-get upgrade -y
      SHELL

    end
  end

end


  - master 1대, worker 2대 구성으로 했다.

  - VM 이미지는 Ubuntu 20.04 Server 기반으로 미리 살짝 꾸며둔 것을 이용했다.

  - VM의 CPU/RAM 설정은 가급적 최소한의 규격으로 잡아두었다.

  - `vagrant up` 했을 때 종종 실패를 하는데, 여러 번 try하면 결국 된다.

  - IP 설정은 각자의 공유기 셋팅에 따라 수정이 필요하다.


4. (master) Kubespray 실행 환경 만들기

  - Kubespray는 ansible 기반이기에 그에 따른 환경을 갖춰야 한다.

  - 필요한 package 설치 후 ssh 접근이 가능하도록 키 생성 & 배포를 진행한다.

  - 패스워드는 `vagrant`이다.


host$ ssh vagrant@192.168.100.200

master$ sudo apt install ansible python3-argcomplete

master$ ssh-keygen

master$ ssh-copy-id 192.168.100.200

master$ ssh-copy-id 192.168.100.201

master$ ssh-copy-id 192.168.100.202


  - ansible에서 접근할 서버 정보들을 입력해놓자

$ sudo nano /etc/ansible/hosts
[all]
master  ansible_ssh_host=192.168.100.200 ip=192.168.100.200 ansible_user=vagrant
worker1 ansible_ssh_host=192.168.100.201 ip=192.168.100.201 ansible_user=vagrant
worker2 ansible_ssh_host=192.168.100.202 ip=192.168.100.202 ansible_user=vagrant

[k8s_master]
master

[k8s_worker]
worker1
worker2

  - 테스트

$ ansible all -m ping


5. (master/worker) Kubernetes 설치를 위한 환경 설정

  - master/worker 모두 Kubernetes 설치를 위한 환경 설정을 진행해야 한다.

  - swap 공간 사용하지 않도록 하고, 서로 접근이 용이하게 되도록 host 설정을 해주자.

  - ip forward 기능도 활성화 시켜줘야 한다.


  - master/worker 접근은 앞에서 했던 것과 마찬가지로 `ssh vagrant@192.168.100.200/201/202` 방식으로...


master/worker$ sudo swapoff -a

master/worker$ sudo nano /etc/fstab
# /swap.img   none    swap    sw  0   0

master/worker$ sudo sh -c 'echo 1 > /proc/sys/net/ipv4/ip_forward'

master/worker$ sudo nano /etc/hosts
192.168.100.200 master
192.168.100.201 worker1
192.168.100.202 worker2


6. (master/worker) Restart

  - 깔끔한 진행을 위해 이 시점에서 모두 restart 진행하고 이후 진행하자!


7. (master) Kubespray 이요한 Kubernetes 설치

  - 이제 기본환경 준비는 끝났다.

  - Kubespray 설치 준비를 할 차례다.

host$ ssh vagrant@192.168.100.200

master$ cd /srv/install

master$ git clone https://github.com/kubernetes-sigs/kubespray.git

master$ cd kubespray

master$ git checkout v2.16.0

master$ sudo pip install -r requirements.txt

master$ cp -rfp inventory/sample inventory/mycluster

master$ declare -a IPS=(192.168.100.200 192.168.100.201 192.168.100.202)

master$ CONFIG_FILE=inventory/mycluster/hosts.yaml python contrib/inventory_builder/inventory.py ${IPS[@]}

master$ nano ./inventory/mycluster/hosts.yaml

  - 아래와 같이 수정해보자.

all:
  hosts:
    master:
      ansible_host: 192.168.100.200
      ip: 192.168.100.200
      access_ip: 192.168.100.200
    worker1:
      ansible_host: 192.168.100.201
      ip: 192.168.100.201
      access_ip: 192.168.100.201
    worker2:
      ansible_host: 192.168.100.202
      ip: 192.168.100.202
      access_ip: 192.168.100.202
  children:
    kube_control_plane:
      hosts:
        master:
    kube_node:
      hosts:
        worker1:
        worker2:
    etcd:
      hosts:
        master:
    k8s_cluster:
      children:
        kube_control_plane:
        kube_node:
    calico_rr:
      hosts: {}

  - 당연하게도 위의 설정은 각자 IP 환경에 맞게 업데이트


master$ nano ./inventory/mycluster/group_vars/k8s_cluster/addons.yml


  - addons는 아래 3개 정도만 해보자. (ingress는 나중에 직접 설치할 것이다)

dashboard_enabled: true
helm_enabled: true
metrics_server_enabled: true


  - proxy mode도 iptables로 변경해보자

master$ nano ./inventory/mycluster/group_vars/k8s_cluster/k8s-cluster.yml
# Kube-proxy proxyMode configuration.
# Can be ipvs, iptables
kube_proxy_mode: iptables


8. (master) execute

  - 이제 정말로 준비는 끝났다. 설치 시작~!!

master$ cd /srv/install/kubespray

master$ ansible-playbook -i inventory/mycluster/hosts.yaml --become --become-user=root cluster.yml


9. (master) 계정 설정

  - root가 아닌 일반 계정에서 `kubectl` 명령어를 사용하기 위한 설정을 하자


master$ mkdir -p $HOME/.kube

master$ sudo cp -i /etc/kubernetes/admin.conf $HOME/.kube/config

master$ sudo chown $(id -u):$(id -g) $HOME/.kube/config

master$ echo "source <(kubectl completion zsh)" >> ~/.zshrc

master$ source ~/.zshrc


10. (master) 점검

  - 잘 되었는지 살펴보자.

master$ kubectl cluster-info
Kubernetes control plane is running at https://127.0.0.1:6443

To further debug and diagnose cluster problems, use 'kubectl cluster-info dump'.


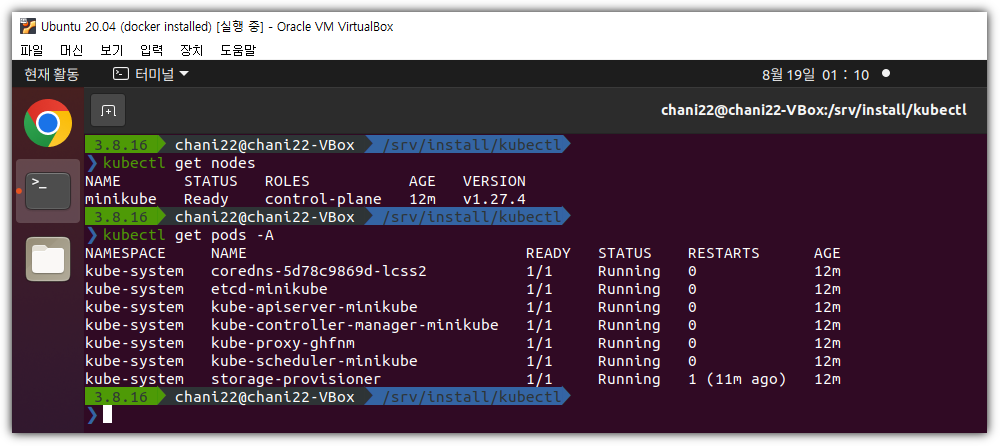
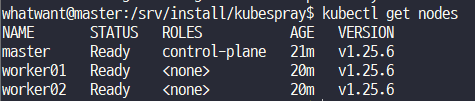
master$ kubectl get nodes
NAME    STATUS     ROLES                  AGE   VERSION
node1   Ready      control-plane,master   14m   v1.20.7
node2   NotReady   <none>                 13m   v1.20.7
node3   NotReady   <none>                 13m   v1.20.7


성공~!!!

반응형

'Dev Tools > Kubernetes' 카테고리의 다른 글

Kubernetes 설치  (0) 2023.04.17
Install `NGINX Ingress Controller` in Kubernetes  (4) 2021.09.18
MinIO StandAlone in Kubernetes  (0) 2021.05.13
Kubespray 이용하여 Kubernetes 설치하기  (4) 2021.05.04
Kubernetes Install (Ubuntu 20.04)  (0) 2020.12.28

MinIO

Amazon S3 서비스를 On-Premise 환경에서 사용할 수 있도록 해주는

최근 많은 인기를 얻고 있는 유명한 Object Storage 프로젝트이다.


https://min.io/


MinIO | High Performance, Kubernetes Native Object Storage

MinIO's High Performance Object Storage is Open Source, Amazon S3 compatible, Kubernetes Native and is designed for cloud native workloads like AI.

min.io


AI 개발환경을 On-Premise에서 구축할 때

사진, 동영상 같은 데이터 또는 컨테이너 이미지와 같은 비정형 데이터를 저장하기 위한 서비스 中

설치도 간편하고 Amazon S3와 호환이 되다보니 MinIO가 아주 유명세를 떨쳤다.


그래서, 신규 시스템을 구축할 때 스토리지 용도로 MinIO를 선택했는데...

막상 해보니... 쉬운 아이가 아닌 것 같다는....


지금부터 설명할 과정은 다음과 같은 환경에서 진행하였다.


- VirtualBox Guest 3개 구성

  . Guest OS : Ubuntu 20.04 Server - 64bit

  . Guest HW : CPU 2 core, MEM 4 GB


- Kubernetes : 1 master, 2 worker node 구성

  . 설치 도구 : Kubespray

  . K8s version : 1.20.6


MinIO 설치는 Kubernetes 환경에서 Standalone 방식으로 진행해보고자 한다.


참고했던 컨텐츠는 아래와 같다.


https://github.com/kubernetes/examples/tree/master/staging/storage/minio


kubernetes/examples

Kubernetes application example tutorials. Contribute to kubernetes/examples development by creating an account on GitHub.

github.com


1. StorageClass

    - 특정 노드의 local storage를 실제 저장공간으로 사용하기 위한 내용으로 작성했다.

    - dynamic provisioning을 위해 volumeBindingMode를 'WaitForFirstComsumer'로 잡았다.


[ minio-standalone-storageclass.yaml ]

apiVersion: storage.k8s.io/v1
kind: StorageClass
metadata:
  name: local-storage

provisioner: kubernetes.io/no-provisioner

volumeBindingMode: WaitForFirstConsumer


2. PersistentVolume

    - worker node 中 하나인, 'worker2'의 특정 디렉토리를 실제 저장 공간으로 정했다.


[ minio-standalone-pv.yaml ]

apiVersion: v1
kind: PersistentVolume
metadata:
  name: local-pv

spec:
  capacity:
    storage: 1Gi

  accessModes:
  - ReadWriteOnce

  persistentVolumeReclaimPolicy: Retain

  storageClassName: local-storage

  local:
    path: /data/volumes/pv1

  nodeAffinity:
    required:
      nodeSelectorTerms:
      - matchExpressions:
        - key: kubernetes.io/hostname
          operator: In
          values:
          - worker2


3. PersistentVolumeClaim

    - 앞에서 선언한 StorageClass, PersistentVolume과 매핑되는 PVC를 작성했다.


[ minio-standalone-pvc.yaml ]

apiVersion: v1
kind: PersistentVolumeClaim
metadata:
  name: minio-pv-claim
  labels:
    app: minio-storage-claim

spec:
  accessModes:
    - ReadWriteOnce

  storageClassName: local-storage

  resources:
    requests:
      storage: 1Gi


4. Deployment

    - MinIO 서비스를 위한 Deployment이며, 당연히 앞에서 선언한 PVC를 사용했다.


[ minio-standalone-deployment.yaml ]

apiVersion: apps/v1
kind: Deployment
metadata:
  name: minio-deployment

spec:
  selector:
    matchLabels:
      app: minio

  strategy:
    type: Recreate

  template:
    metadata:
      labels:
        app: minio

    spec:
      volumes:
      - name: storage
        persistentVolumeClaim:
          claimName: minio-pv-claim

      containers:
      - name: minio
        image: minio/minio:latest
        args:
        - server
        - /storage
        env:
        - name: MINIO_ACCESS_KEY
          value: "minio"
        - name: MINIO_SECRET_KEY
          value: "minio123"
        ports:
        - containerPort: 9000
          hostPort: 9000
        volumeMounts:
        - name: storage
          mountPath: "/storage"


5. Service

    - MinIO 서비스를 외부로 노출하기 위한 Service를 선언해보았다.


[ minio-standalone-service.yaml ]

apiVersion: v1
kind: Service
metadata:
  name: minio-service

spec:
  type: NodePort

  ports:
    - port: 9000
      targetPort: 9000
      nodePort: 30333

  selector:
    app: minio


[ 결과 ]

여기까지

차례대로 create 하면 MinIO 서비스 웹을 볼 수 있다.


MinIO


Access Key / Secret Key 값은 Deployment YAML을 보면 확인할 수 있다.


MinIO


오른쪽 하단에 있는 "+" 버튼을 통해 bucket도 생성할 수 있고, 파일도 업로드 할 수 있다.

물론 다운로드도 가능한 Storage 웹서비스를 확인할 수 있다.


반응형

Kubernetes를 쌩으로(?) 설치하기 너무 귀찮기에

조금 편하게 설치하기 위해 Kubespray를 이용해보기로 했다.


   - kubernetes.io/ko/docs/setup/production-environment/tools/kubespray/


Kubespray로 쿠버네티스 설치하기

이 가이드는 Kubespray를 이용하여 GCE, Azure, OpenStack, AWS, vSphere, Packet(베어메탈), Oracle Cloud infrastructure(실험적) 또는 베어메탈 등에서 운영되는 쿠버네티스 클러스터를 설치하는 과정을 보여준다. Kub

kubernetes.io

설치를 진행한 환경은 다음과 같다.


  - Location : Home (SKB Internet - 500Mbps)

  - Host OS : Windows 10 64bit

  - VM S/W : VirtualBox

  - Guest OS : Ubuntu 20.04 Server 64bit (3개 VM)

    . CPU : 2 Core

    . Mem : 4096 MB

    . N/W : Bridge


1. python 설치

  - 설치되어 있는 python을 확인해보자.


$ ls /usr/bin | grep python
python3
python3.8


  - ubuntu 20.04 에서는 기본적으로 3.8이 설치되어 있는듯하다.

  - 사용하기 편하도록 기본 `python`에 mapping 하자.


$ sudo update-alternatives --config python
update-alternatives: error: no alternatives for python

$ sudo update-alternatives --install /usr/bin/python python /usr/bin/python3.8 1
$ sudo update-alternatives --config python

$ python --version
Python 3.8.5


  - `pip`도 설치해보자.


$ sudo apt install python3-pip

$ sudo update-alternatives --install /usr/bin/pip pip /usr/bin/pip3 1
$ sudo update-alternatives --config pip3

$ pip --version
pip 20.0.2 from /usr/lib/python3/dist-packages/pip (python 3.8)


2. ansible 설치

  - kubespray는 `ansible`을 기본으로 사용한다.


$ sudo apt install ansible python3-argcomplete

$ ansible --version
ansible 2.9.6
  config file = /etc/ansible/ansible.cfg
  configured module search path = ['/home/whatwant/.ansible/plugins/modules', '/usr/share/ansible/plugins/modules']
  ansible python module location = /usr/lib/python3/dist-packages/ansible
  executable location = /usr/bin/ansible
  python version = 3.8.5 (default, Jan 27 2021, 15:41:15) [GCC 9.3.0]


3. SSH 키 복사하기

  - `ansible`을 기본으로 사용하기에, 3대의 VM에 ssh 접속을 바로 할 수 있도록 SSH 키를 모두 복사해야 한다.


  - `master`로 사용할 VM에서 `ssh-keygen`으로 key를 생성한 뒤, copy하면 된다.

  - 개인적으로 사용하는 SSH 키가 있다면 그것을 사용하면 되고...


$ ssh-keygen

$ ssh-copy-id 192.168.122.10
(Master Node와 Worker Node에 모두 키를 복사)


4. swap 메모리 비활성화

  - kubernetes를 설치하기 위해선 swap 메모리를 모두 비활성화 해야 한다.

  - master/worker node에 사용할 3대의 VM 모두 꺼버리자!


$ sudo swapoff -a


5. ip forward 설정

  - K8s는 가상 네트워크 환경을 사용해야 하기에 ip_forward를 활성화 해야 한다.

  - master/worker node에 사용할 3대의 VM 모두 적용 !!!


$ sudo sh -c 'echo 1 > /proc/sys/net/ipv4/ip_forward'

$ cat /proc/sys/net/ipv4/ip_forward
1


  - 위와 같은 설정은 본래 재부팅하면 풀려야 하는데... 재부팅해도 그대로 유지되기에 내버려두고 있다.
  - 나중에 한 번 확인해봐야 할 것 같다.


6. hosts 등록

  - hostname으로 서버에 접속할 수 있도록 hosts 파일에 3개 VM hostname을 등록하자.

  - master/worker node에 사용할 3대의 VM 모두 적용 !!!


$ sudo nano /etc/hosts
192.168.100.111 master-stg
192.168.100.112 worker1
192.168.100.113 worker2


  - 각자의 hostname 과 IP 상황에 맞게 적용하면 된다.


7. kubespray 실행

  - `git clone` 받은 뒤, 필요한 패키지 설치하도록 하고, 나만의 환경 설정을 하자.


$ git clone https://github.com/kubernetes-sigs/kubespray.git

$ cd kubespray

$ git checkout release-2.15

$ sudo pip install -r requirements.txt

$ cp -rfp inventory/sample inventory/mycluster

$ declare -a IPS=(192.168.100.111 192.168.100.112 192.168.100.113)

$ CONFIG_FILE=inventory/mycluster/hosts.yaml python3 contrib/inventory_builder/inventory.py ${IPS[@]}


  - `cp`를 하는 것은, sample을 기본으로 나만의 inventory를 만들기 위함이다.

  - `declare`는 설치할 VM들의 IP를 적어주면 된다.

  - `CONFIG_FILE`을 실행하면 `declare`로 알려준 VM 정보들을 이용하여 config file을 만들어준다.


  - master node로 사용할 아이와 worker node를 사용할 아이들에 대해서 설정을 맞춰주자.

  - hostname도 맞춰서 적어주는 것이 좋다.


$ nano inventory/mycluster/hosts.yaml

all:
  hosts:
    master-stg:
      ansible_host: 192.168.100.111
      ip: 192.168.100.111
      access_ip: 192.168.100.111
    worker1:
      ansible_host: 192.168.100.112
      ip: 192.168.100.112
      access_ip: 192.168.100.112
    worker2:
      ansible_host: 192.168.100.113
      ip: 192.168.100.113
      access_ip: 192.168.100.113
  children:
    kube_control_plane:
      hosts:
        master-stg:
    kube_node:
      hosts:
        worker1:
        worker2:
    etcd:
      hosts:
        master-stg:
    k8s_cluster:
      children:
        kube_control_plane:
        kube_node:
    calico_rr:
      hosts: {}


  - addon도 필요한 것들을 true로 만들어주자.


$ nano ./inventory/mycluster/group_vars/k8s_cluster/addons.yml

dashboard_enabled: true
metrics_server_enabled: true
ingress_nginx_enabled: true


8. Static IP 설정

  - DHCP 설정으로 되어있으면 Node의 `/etc/resolv.conf`에 잡스러운(?) 내용이 들어가고

  - 그렇게 되면 K8s의 coredns에서 Node의 `/etc/resolv.conf`를 참고하게 되면서

  - Pod의 Container 안에 있는 `/etc/resolv.conf`에도 그 내용이 반영되어서

  - FQDN 관련해서 원하지 않는 결과가 나올 수 있다.


❯ cd /etc/netplan/

❯ sudo cp ./00-installer-config.yaml ./00-installer-config.yaml.210504

❯ sudo nano ./00-installer-config.yaml

network:
  ethernets:
    enp0s3:
      dhcp4: no
      dhcp6: no
      addresses: [192.168.100.111/24]
      gateway4: 192.168.100.1
      nameservers:
        addresses: [8.8.8.8,8.8.4.4]
  version: 2


9. 설치

  - 이제 준비는 끝났다. 고! 고!


$ ansible-playbook -i inventory/mycluster/hosts.yaml  --become --become-user=root cluster.yml


10. 사용자 계정 설정

  - root 계정이 아닌 사용자 계정에서 `kubectl` 명령어를 사용하기 위해서는 다음과 같이...


$ mkdir -p $HOME/.kube

$ sudo cp -i /etc/kubernetes/admin.conf $HOME/.kube/config

$ sudo chown $(id -u):$(id -g) $HOME/.kube/config


11. zsh 자동 완성 셋팅


> echo "source <(kubectl completion zsh)" >> ~/.zshrc
> source ~/.zshrc


12. 재부팅 후

  - 희한하게 서버들을 재부팅 하고, `kubectl` 사용을 하면 API Server 연결을 거부당했다는 메시지가 나온다.

  - 그러면 swap 메모리 설정을 한 번 해주면 해결이 된다.


$ sudo swapoff -a


13. 결과

  - 이렇게 잘 나온다~


$ kubectl get nodes -o wide
NAME         STATUS   ROLES                  AGE   VERSION   INTERNAL-IP       EXTERNAL-IP   OS-IMAGE             KERNEL-VERSION     CONTAINER-RUNTIME
master-stg   Ready    control-plane,master   37h   v1.20.6   192.168.100.111   <none>        Ubuntu 20.04.2 LTS   5.4.0-72-generic   docker://19.3.15
worker1      Ready    <none>                 37h   v1.20.6   192.168.100.112   <none>        Ubuntu 20.04.2 LTS   5.4.0-72-generic   docker://19.3.15
worker2      Ready    <none>                 37h   v1.20.6   192.168.100.113   <none>        Ubuntu 20.04.2 LTS   5.4.0-72-generic   docker://19.3.15


반응형


Kubernetes 설치를 해보자 한다.


Master Node & Worker Node 각 1대씩 구성을 하고자 한다.


물리적으로 분리된 BareMetal 구성을 하려고 했지만,

자유로운 설정을 통해 학습해보기 위해서 VirtualBox로 우선 진행해 보았다.


정말 훌륭한 레퍼런스는 아래 링크와 같다 !!!

  - https://medium.com/finda-tech/overview-8d169b2a54ff


1. Master & Worker Node H/W


  - Prerequisite


구분  CPU Memory Storage 
 Master 2 core 3 GB 30 GB
 Worker 2 core 2 GB 30 GB


  - VirtualBox


구분  CPU Memory Storage 
 Master 2 core 4 GB 50 GB
 Worker 2 core 4 GB 50 GB


    . 네트워크는 NAT가 아니라 Bridge로 잡아줬다. (공유기 환경)


2. Master & Worker Node S/W


  - Ubuntu 20.04 LTS Server 설치를 하면서, 기본적인 환경 설치는 아래 링크와 동일하게 구성하였다.

    . https://www.whatwant.com/entry/notebook-ubuntu-server


  - Docker 까지는 미리 설치해두었다. 설치 방법은 아래 링크와 같이 진행하였다.

    . https://www.whatwant.com/entry/Docker-Install-Ubuntu-Server-2004


    . kubernetes validated versions이 따로 있으니 이것에 맞추는 것을 추천한다.


3. Swap off


  - kubelet에서 swap을 지원하지 않기 때문에, Master/Worker 모두 swap 기능을 꺼야 한다.


$ sudo swapoff -a


  - 영구적으로 기능을 끄기 위해서는 추가 작업도 해줘야 한다.


$ sudo nano /etc/fstab


  - swap 부분을 찾아서 주석 처리 해주면 된다.


#/swap.img  none    swap    sw  0   0


4. cgroup driver 설정


  - 이미 설치된 docker에 대해서 cgroup driver를 변경해줘야 한다.


$ docker info


  - 지금은 "cgroupfs"로 설정되어 있는 것을 볼 수 있다. "systemd"로 변경해보자.


$ sudo nano /etc/docker/daemon.json


{

    "exec-opts": ["native.cgroupdriver=systemd"],

    "log-driver": "json-file",

    "log-opts": {

        "max-size": "100m"

    },

    "storage-driver": "overlay2"

}


$ sudo mkdir -p /etc/systemd/system/docker.service.d


$ sudo systemctl daemon-reload


$ sudo systemctl restart docker


  - "cgroup driver"가 잘 변경된 것을 볼 수 있다.


5. Kubernetes 기본 패키지 설치


  - Master/Worker Node 모두 [ kubeadm, kubelet, kubectl ] 3개의 패키지가 설치되어야 한다.

    . 부수적으로 [ kubernetes-cni, cri-tools ] 2개 패키지도 필요하다.


  - 아래에서 최신 버전의 주소(파일명) 확인 (16.04 이후 버전 모두 동일)

    . https://packages.cloud.google.com/apt/dists/kubernetes-xenial/main/binary-amd64/Packages


$ wget https://packages.cloud.google.com/apt/pool/cri-tools_1.13.0-01_amd64_4ff4588f5589826775f4a3bebd95aec5b9fb591ba8fb89a62845ffa8efe8cf22.deb


$ wget https://packages.cloud.google.com/apt/pool/kubeadm_1.20.1-00_amd64_7cd8d4021bb251862b755ed9c240091a532b89e6c796d58c3fdea7c9a72b878f.deb


$ wget https://packages.cloud.google.com/apt/pool/kubectl_1.20.1-00_amd64_b927311062e6a4610d9ac3bc8560457ab23fbd697a3052c394a1d7cc9e46a17d.deb


$ wget https://packages.cloud.google.com/apt/pool/kubelet_1.20.1-00_amd64_560a52294b8b339e0ca8ddbc480218e93ebb01daef0446887803815bcd0c41eb.deb


$ wget https://packages.cloud.google.com/apt/pool/kubernetes-cni_0.8.7-00_amd64_ca2303ea0eecadf379c65bad855f9ad7c95c16502c0e7b3d50edcb53403c500f.deb


  - 설치도 진행하자


$ sudo apt-get install socat conntrack ebtables


$ sudo dpkg --install ./kubernetes-cni_0.8.7-00_amd64_ca2303ea0eecadf379c65bad855f9ad7c95c16502c0e7b3d50edcb53403c500f.deb


$ sudo dpkg --install ./kubelet_1.20.1-00_amd64_560a52294b8b339e0ca8ddbc480218e93ebb01daef0446887803815bcd0c41eb.deb


$ sudo dpkg --install ./cri-tools_1.13.0-01_amd64_4ff4588f5589826775f4a3bebd95aec5b9fb591ba8fb89a62845ffa8efe8cf22.deb


$ sudo dpkg --install ./kubectl_1.20.1-00_amd64_b927311062e6a4610d9ac3bc8560457ab23fbd697a3052c394a1d7cc9e46a17d.deb


$ sudo dpkg --install ./kubeadm_1.20.1-00_amd64_7cd8d4021bb251862b755ed9c240091a532b89e6c796d58c3fdea7c9a72b878f.deb


6. Master Node 셋업


  - kubeadm을 이용하여 Master Node 셋업을 진행하자.


  - Master Node의 IP를 확인하자


$ ifconfig


  - 이제 셋업 시작~!! (뒤의 IP는 방금 확인한 IP로 교체!!)


$ sudo kubeadm init --pod-network-cidr=10.244.0.0/16 --apiserver-advertise-address=192.168.100.119


❯ sudo kubeadm init --pod-network-cidr=10.244.0.0/16 --apiserver-advertise-address=192.168.100.119

[init] Using Kubernetes version: v1.20.1

[preflight] Running pre-flight checks

[WARNING SystemVerification]: this Docker version is not on the list of validated versions: 20.10.1. Latest validated version: 19.03

[preflight] Pulling images required for setting up a Kubernetes cluster

[preflight] This might take a minute or two, depending on the speed of your internet connection

[preflight] You can also perform this action in beforehand using 'kubeadm config images pull'

[certs] Using certificateDir folder "/etc/kubernetes/pki"

[certs] Generating "ca" certificate and key

[certs] Generating "apiserver" certificate and key

[certs] apiserver serving cert is signed for DNS names [kubernetes kubernetes.default kubernetes.default.svc kubernetes.default.svc.cluster.local master-stg] and IPs [10.96.0.1 192.168.100.119]

[certs] Generating "apiserver-kubelet-client" certificate and key

[certs] Generating "front-proxy-ca" certificate and key

[certs] Generating "front-proxy-client" certificate and key

[certs] Generating "etcd/ca" certificate and key

[certs] Generating "etcd/server" certificate and key

[certs] etcd/server serving cert is signed for DNS names [localhost master-stg] and IPs [192.168.100.119 127.0.0.1 ::1]

[certs] Generating "etcd/peer" certificate and key

[certs] etcd/peer serving cert is signed for DNS names [localhost master-stg] and IPs [192.168.100.119 127.0.0.1 ::1]

[certs] Generating "etcd/healthcheck-client" certificate and key

[certs] Generating "apiserver-etcd-client" certificate and key

[certs] Generating "sa" key and public key

[kubeconfig] Using kubeconfig folder "/etc/kubernetes"

[kubeconfig] Writing "admin.conf" kubeconfig file

[kubeconfig] Writing "kubelet.conf" kubeconfig file

[kubeconfig] Writing "controller-manager.conf" kubeconfig file

[kubeconfig] Writing "scheduler.conf" kubeconfig file

[kubelet-start] Writing kubelet environment file with flags to file "/var/lib/kubelet/kubeadm-flags.env"

[kubelet-start] Writing kubelet configuration to file "/var/lib/kubelet/config.yaml"

[kubelet-start] Starting the kubelet

[control-plane] Using manifest folder "/etc/kubernetes/manifests"

[control-plane] Creating static Pod manifest for "kube-apiserver"

[control-plane] Creating static Pod manifest for "kube-controller-manager"

[control-plane] Creating static Pod manifest for "kube-scheduler"

[etcd] Creating static Pod manifest for local etcd in "/etc/kubernetes/manifests"

[wait-control-plane] Waiting for the kubelet to boot up the control plane as static Pods from directory "/etc/kubernetes/manifests". This can take up to 4m0s

[apiclient] All control plane components are healthy after 13.002889 seconds

[upload-config] Storing the configuration used in ConfigMap "kubeadm-config" in the "kube-system" Namespace

[kubelet] Creating a ConfigMap "kubelet-config-1.20" in namespace kube-system with the configuration for the kubelets in the cluster

[upload-certs] Skipping phase. Please see --upload-certs

[mark-control-plane] Marking the node master-stg as control-plane by adding the labels "node-role.kubernetes.io/master=''" and "node-role.kubernetes.io/control-plane='' (deprecated)"

[mark-control-plane] Marking the node master-stg as control-plane by adding the taints [node-role.kubernetes.io/master:NoSchedule]

[bootstrap-token] Using token: t4tcwj.22xh9lzstu56qyrb

[bootstrap-token] Configuring bootstrap tokens, cluster-info ConfigMap, RBAC Roles

[bootstrap-token] configured RBAC rules to allow Node Bootstrap tokens to get nodes

[bootstrap-token] configured RBAC rules to allow Node Bootstrap tokens to post CSRs in order for nodes to get long term certificate credentials

[bootstrap-token] configured RBAC rules to allow the csrapprover controller automatically approve CSRs from a Node Bootstrap Token

[bootstrap-token] configured RBAC rules to allow certificate rotation for all node client certificates in the cluster

[bootstrap-token] Creating the "cluster-info" ConfigMap in the "kube-public" namespace

[kubelet-finalize] Updating "/etc/kubernetes/kubelet.conf" to point to a rotatable kubelet client certificate and key

[addons] Applied essential addon: CoreDNS

[addons] Applied essential addon: kube-proxy


Your Kubernetes control-plane has initialized successfully!


To start using your cluster, you need to run the following as a regular user:


  mkdir -p $HOME/.kube

  sudo cp -i /etc/kubernetes/admin.conf $HOME/.kube/config

  sudo chown $(id -u):$(id -g) $HOME/.kube/config


Alternatively, if you are the root user, you can run:


  export KUBECONFIG=/etc/kubernetes/admin.conf


You should now deploy a pod network to the cluster.

Run "kubectl apply -f [podnetwork].yaml" with one of the options listed at:

  https://kubernetes.io/docs/concepts/cluster-administration/addons/


Then you can join any number of worker nodes by running the following on each as root:


kubeadm join 192.168.100.119:6443 --token t4tcwj.22xh9lzstu56qyrb \

    --discovery-token-ca-cert-hash sha256:eb3765b58c9140c9a89daf7ea21444ca44a142939ebb93aedad1ebc03202a1d7


  - 사용자 계정에서 kubectl 실행을 위해 위의 가이드 내용 그대로 진행을 해보자.


$ mkdir -p $HOME/.kube


$ sudo cp -i /etc/kubernetes/admin.conf $HOME/.kube/config


$ sudo chown $(id -u):$(id -g) $HOME/.kube/config


  - 잘 설치가 된 것을 확인해보자.


$ kubectl get pods --all-namespaces


$ kubectl get nodes


  - Pod Network 환경을 맞춰야 하는데, k8s 를 위한 layer 3 환경을 구축해주는 flannel을 사용해보겠다.

    . https://github.com/coreos/flannel/


$ kubectl apply -f https://raw.githubusercontent.com/coreos/flannel/master/Documentation/kube-flannel.yml


  - coredns가 pending에서 running으로 바뀌었고, flannel이 추가 되었고, Master Node가 Ready 상태가 된 것을 볼 수 있다.


7. Worker Node 셋업
 
  - 기본 환경 설치를 모두 했다면, 아래 명령어만 실행하면 된다.
  - 아래 명령어는 Master Node 설치할 때 나왔던 가이드 밑에 있는 부분 그대로 하면 된다. (각자의 환경에 따라서 실행할 것!!!)
 
$ sudo kubeadm join 192.168.100.119:6443 --token t4tcwj.22xh9lzstu56qyrb \
    --discovery-token-ca-cert-hash sha256:eb3765b58c9140c9a89daf7ea21444ca44a142939ebb93aedad1ebc03202a1d7
 
❯ sudo kubeadm join 192.168.100.119:6443 --token t4tcwj.22xh9lzstu56qyrb \
    --discovery-token-ca-cert-hash sha256:eb3765b58c9140c9a89daf7ea21444ca44a142939ebb93aedad1ebc03202a1d7
 
[preflight] Running pre-flight checks
[WARNING SystemVerification]: this Docker version is not on the list of validated versions: 20.10.1. Latest validated version: 19.03
[preflight] Reading configuration from the cluster...
[preflight] FYI: You can look at this config file with 'kubectl -n kube-system get cm kubeadm-config -o yaml'
[kubelet-start] Writing kubelet configuration to file "/var/lib/kubelet/config.yaml"
[kubelet-start] Writing kubelet environment file with flags to file "/var/lib/kubelet/kubeadm-flags.env"
[kubelet-start] Starting the kubelet
[kubelet-start] Waiting for the kubelet to perform the TLS Bootstrap...
 
This node has joined the cluster:
* Certificate signing request was sent to apiserver and a response was received.
* The Kubelet was informed of the new secure connection details.
 
Run 'kubectl get nodes' on the control-plane to see this node join the cluster.
 
  - Master Node에서 잘 붙었는지 확인해보자.
 
$ kubectl get nodes


8. hello kubernetes
 
  - Master Node에서 다음과 같이 deployment를 실행해보자.
 
$ kubectl create deployment kubernetes-bootcamp --image=gcr.io/google-samples/kubernetes-bootcamp:v1
 
  - 잘 되었는지 확인도 해보자.
 
$ kubectl get deployments
 
$ kubectl get pods -o wide


  - Worker Node에서 해당 서비스가 잘 되는지 확인해보자.


$ curl http://10.244.1.2:8080


여기까지~


반응형

+ Recent posts